
Chocolate Peanut Butter Blossom Cookies have always reminded me of the December afternoons I spent in my grandmother’s warm kitchen, watching her line shiny Hershey’s Kisses next to cooling trays of cookies. She would let me unwrap each chocolate piece, telling me that the “kiss on top” was the final touch that made the cookie feel like a hug.
Table of Contents
Table of Contents
Years later, as I shared the same recipe with friends, I realized how universal that moment felt. These cookies connect generations, giving all of us you, me, and anyone who loves peanut butter and chocolate a delicious reason to pause, enjoy, and share something sweet. This small story is why this recipe still feels special every time I bake it.
Why You’ll Love These Chocolate Peanut Butter Blossom Cookies
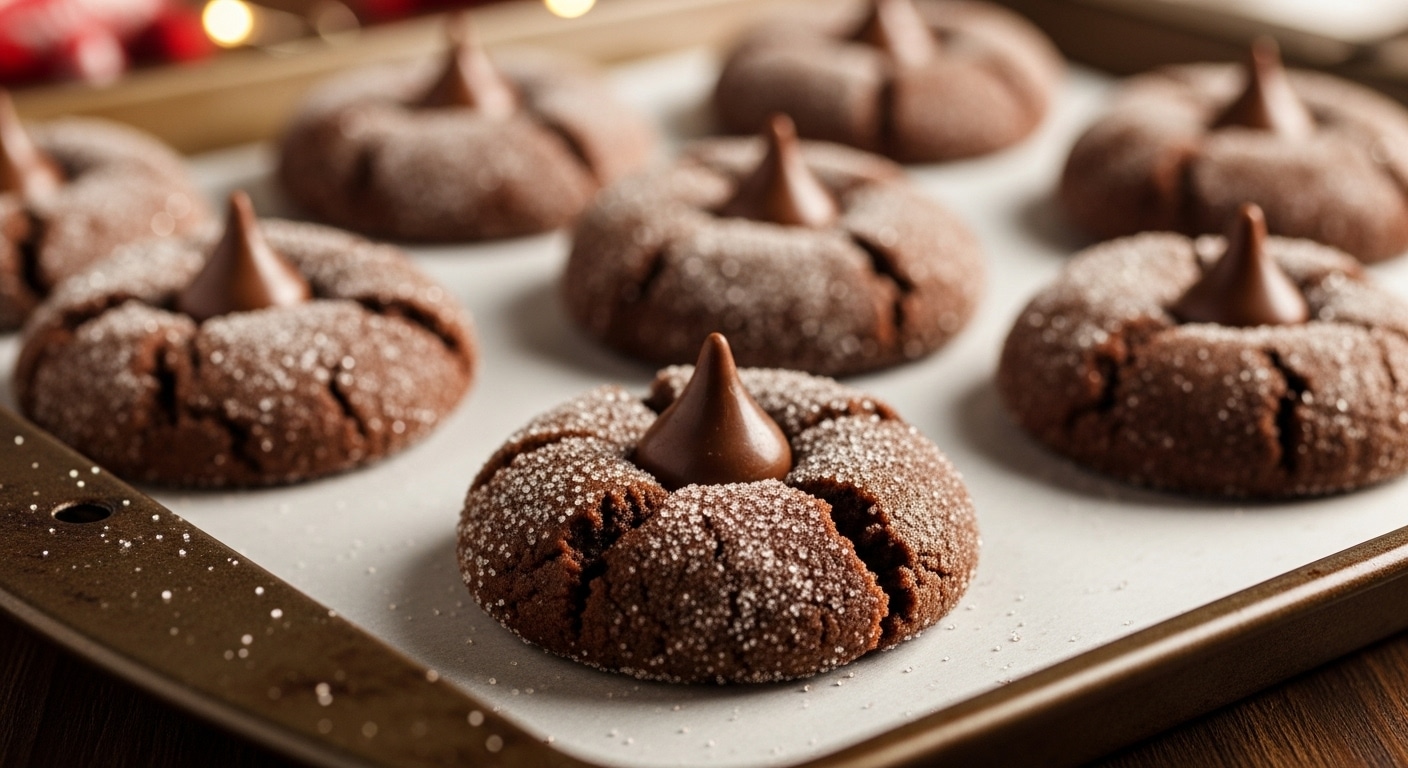
If you love the classic peanut butter blossom but wish it had a deeper, richer chocolate flavor, these Chocolate Peanut Butter Blossom Cookies will become your new favorite. They combine the familiar softness of a peanut butter cookie with cocoa powder for a beautiful chocolate twist.
This recipe uses simple pantry ingredients, comes together quickly, and bakes into soft, puffy cookies that pair perfectly with the iconic chocolate kiss on top. Whether you bake them for Christmas cookie trays, school parties, dessert nights, or holiday gifts, they always disappear fast. Chocolate Peanut Butter Blossom Cookies
Ingredients for Chocolate Peanut Butter Blossom Cookies
For the Cookie Dough
- ½ cup unsalted butter, softened
- ½ cup creamy peanut butter (no-stir style)
- ½ cup granulated sugar
- ½ cup packed brown sugar
- 1 large egg
- 1 teaspoon vanilla extract
- ½ teaspoon baking soda
- ½ teaspoon salt
- 1 tablespoon milk (or nondairy milk)
- ¼ cup unsweetened cocoa powder (Hershey’s preferred)
- 1 ¼ cups all-purpose flour

For Rolling
- ¼ cup granulated sugar (for rolling dough balls)
For Topping
- 36 Hershey’s Kisses, unwrapped
Ingredient Notes (Substitutions & Healthy Swaps)
Peanut Butter:
Creamy no-stir peanut butter works best. Natural peanut butter can make the dough crumbly, but if you must use it, add an extra teaspoon of milk to help bind the dough.
Butter:
Use unsalted butter to control salt levels. If you only have salted butter, remove the added salt from the recipe.
Sugars:
A blend of brown and white sugar gives the perfect balance of softness and structure. Coconut sugar can replace brown sugar for a slightly deeper flavor.
Milk:
The secret ingredient! It keeps the cookies soft. You can use almond, oat, or soy milk if you need a dairy-free option.
Cocoa Powder:
Stick with unsweetened natural cocoa powder. Dutch-process cocoa will change the acidity and texture.
Flour:
Always spoon and level your flour instead of packing it. Packing leads to dense, dry cookies.
Chocolate Kiss Substitutes:
If you prefer a different topping, you can use:
- Mini peanut butter cups
- Chocolate chunks
- Caramel-filled chocolates
- Dark chocolate pieces
Step-by-Step Instructions
Step 1 – Cream the Butter, Peanut Butter, and Sugars
In a large bowl, use a mixer to cream together the softened butter, peanut butter, granulated sugar, and brown sugar. Mix until the mixture becomes smooth, fluffy, and slightly lighter in color. This step adds air, which keeps the cookies soft and puffy.
Step 2 – Add Wet Ingredients and Dry Leaveners
Add the egg, vanilla, baking soda, salt, and milk. Mix again until fully combined. The dough should look silky and smooth at this point.
Step 3 – Add Cocoa Powder
Add the cocoa powder and mix until the color is completely even. Scrape the bowl to make sure no streaks remain.
Step 4 – Add the Flour
Add the flour gradually, mixing on low until the dough forms. It should be soft but not sticky. If it feels too wet, let it rest for 5 minutes it will firm up naturally.
Step 5 – Scoop and Roll
Scoop 1-tablespoon portions of dough, roll them into balls between your palms, then roll each ball in granulated sugar. Place them on a parchment-lined baking sheet, leaving 2 inches of space.
Step 6 – Bake
Bake at 350°F (175°C) for 8–12 minutes. The cookies are done when the tops lose their glossy look. They won’t flatten they stay puffy to form the blossom shape.
Step 7 – Add the Chocolate Kisses
Press one unwrapped Hershey’s Kiss into the center of each warm cookie. The chocolate will soften slightly and then firm up beautifully as it cools.
Step 8 – Cool and Serve
Allow the cookies to cool completely before removing them from the baking sheet to keep the chocolate tops intact. Chocolate Peanut Butter Blossom Cookies
Pro Tips for Success
- Measure flour and cocoa lightly using the spoon-and-level method to avoid dry, dense cookies.
- Don’t over-bake pull the cookies when they just lose their shine; they continue to set as they cool.
- Unwrap the chocolates before baking so they’re ready to press immediately when the cookies come out of the oven.
- Chill the chocolates for 10 minutes before use to prevent melting too much.
- Use room temperature ingredients for the smoothest dough texture.
- Bake on parchment paper for even browning and easy cleanup.
Flavor Variations
- Double Chocolate Blossoms Use dark chocolate kisses for extra richness.
- Salted Peanut Blossoms Sprinkle flaky sea salt on top after adding the kiss.
- Holiday Mint Blossoms Add peppermint kisses for a festive twist.
- Caramel-Filled Blossoms Use caramel-filled chocolates for gooey centers.
- White Chocolate Blossoms Swap to white chocolate hugs for a striped holiday design.
Serving Suggestions
- Perfect for Christmas cookie boxes
- Excellent on hot cocoa or holiday dessert tables
- Serve with warm milk, tea, or coffee
- Great for bake sales or school events
- Wrap in gift bags with holiday ribbon
Storage and Freezing Instructions
Room Temperature:
Store in an airtight container for up to 4 days.
Refrigerator:
Not recommended refrigerating dries them out.
Freezer:
Freeze baked cookies for up to 3 months.
To freeze the dough, roll balls and freeze on a tray, then transfer to a freezer bag.
Nutrition Facts (Per Serving)
| Nutrient | Amount |
|---|---|
| Calories | 130 |
| Protein | 2g |
| Carbs | 16g |
| Fat | 7g |
| Fiber | 1g |
| Sodium | 95mg |
FAQ About Chocolate Peanut Butter Blossom Cookies
Do I need to chill the dough?
Chilling isn’t required for this recipe, which makes it faster than many cookie recipes. However, if your kitchen is very warm and the dough feels soft, chilling for 15 minutes can help the cookies keep their perfect round shape. The added milk keeps the dough soft enough even without chilling.
Why did my chocolate kisses melt?
If the kisses melt too much, they may have been added to cookies that were overly hot or over-baked. Pressing the kiss into the cookie immediately after baking is correct, but cooling is key. You can also chill the chocolates beforehand so they hold their shape better.
Can I make these cookies without peanut butter?
Yes! Substitute the peanut butter with almond butter, cashew butter, or sunflower seed butter. The flavor will be slightly different, but the texture remains similar. Check sweetness levels, as some nut butters are less sweet.
Why did my cookies turn out dry?
Dry cookies often come from too much flour or over-baking. Make sure you spoon and level your flour rather than packing it. Remove the cookies when they lose their gloss, even if they seem soft; they firm slightly as they cool.
Can I make them with gluten-free flour?
A 1:1 gluten-free all-purpose flour blend works well for this recipe. Choose a blend that contains xanthan gum for the best texture. The dough may be slightly softer, so adding a teaspoon of extra flour may help shape the balls.
Final Thoughts
Chocolate Peanut Butter Blossom Cookies are a beautiful twist on the classic peanut butter blossom recipe that so many of us grew up loving. They’re soft, chocolatey, nostalgic, and incredibly easy to make for any holiday or celebration.
Whether you bake them for Christmas cookie exchanges or as a simple family treat, they always bring joy. Keep this recipe bookmarked it’s one you’ll come back to every year.
For more recipes, please JOIN us in Tastymealsrecipes in facebook page.